All of our whirlpool tubs can be installed in at least one of three possible ways:
- Drop in
- Alcove
- Undermount
Below, we will explain how each of these three methods work, which tubs are applicable, and we will list tips and tricks for installing your tub for each one. This guide works for both Whirlpool Bath Tubs, and Air Bath Tubs.
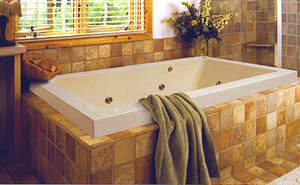
The drop in installation method is the most common installation method for really nice whirlpool baths. You build a raised deck that comes up to the lip of the tub enclosing everything below. You can use tile or marble for the deck top that can be just a few inches larger than the tub or you could have several feet of extra tile top. It’s a nice place for plants or flowers or candles.
Start by determining the depth of the tub so you know how tall your deck needs to be. You want to find the measurement from the underside of the lip of the tub to the bottom of the tub, where the feet or bottom support of the tub is. Basically with the tub sitting on the floor you would measure from the floor to the underside of the lip. Keep in mind that tubs that do not have support feet will sit crooked on the floor because the bottom of the tub is pitched so water runs toward the drain. When the tub is set in place with the top lip level you will have the correct pitch at the bottom of the tub for full draining.
Once you have established that dimension you should add an inch or two to that measurement. If you build your deck a little too tall it’s simple to shim up underneath the tub to close that gap but if you build your deck a little too short the tub will stick up too high when you set it in place and there isn’t anything you can do about that. So build the deck slightly higher than what you think you need.
The idea is to build the structural part, the base of the deck using 2x4 or 2x6 lumber and plywood. You want to get the framework done but leave the front open. If you plan to use tile or marble for the top you will probably want to use 2 layers of 3⁄4” plywood so there is no movement and your tile or grout won’t ever crack. Personally I would also use construction adhesive or wood glue between the layers so it is super strong and with no movement. Make sure you factor in the thickness of your framing materials and your tile thickness with mortar so you end up with a finished height, from the top of the tile to the bottom of your enclosure that is slightly more than the height of your tub from the underside of the lip to the bottom of the outside of the tub. Feel free to call us at
1-800-809-9111 if you would like to speak to an installation expert.
The opening in the top of the deck should be approximately 2” smaller in diameter than the overall diameter of the top lip of the tub you are installing. 2” overall would mean that when you set the tub into this opening the tile will extend 1” under the lip of the tub all the way around. Check the tub to make sure nothing below the lip extends out farther than the lip. Remember the lower part of the tub has to fit through this opening so check that out. Some whirlpools have pumps or fittings that may stick out beyond the footprint of the top. Normally that isn’t a problem because you can set that end in the opening first, slide the tub centered over the opening and it fits. If a tub has a pump on each side that both stick out slightly beyond the top lip you will need to factor that into your installation plan.
Make sure you have proper clearance for your waste and overflow kit too. Hopefully you have reasonable access from the front of the deck and your access panel. Once the tub is set in place you can reach in there and get the drain pipes glued together. If you have the clearance you could install the waste and overflow kit into the tub before you set it into the opening for the final time. Once you put that drain fitting on you need to be very careful with it because the drain hangs off the bottom and could easily crack or break if set down with the weight of the tub on it. If the clearance allows you could set the tub in place first then install and connect the drain kit. This will vary based on your specific installation.
At this point you can install the tile or marble top and tile right up to the edge of your opening. Once your tile is finished, grouted and set you can test fit the tub. Set some 1/8” wood shims around the edge of the opening on the tile top. Carefully set the tub into the opening and gently lower it down onto the shims. The bottom lip of the tub should not set directly on the tile or marble, it should rest only on the shims. Do not step into the tub while it’s hanging from the tub lip. Once the tub is in place look into the open front of your deck at the gap between the bottom of the tub and your floor below the tub. You want somewhere around a 1” gap. If the gap is a few inches, use scrap plywood, 2 x 4, 2 x 6, whatever is needed to build up the floor to reduce the gap to about that 1”. Screw those shim pieces together so they don’t shift of move. If you have about a 1” gap you will only need 1 bag of Portland cement to set most tubs into. If your gap is too big you will need a bunch of heavy Portland cement to fill that gap and that isn’t good or necessary.
Remove the tub from the deck and for simplicity you can have a couple of 2 x 4’s nearby that you can set across the opening in your tile deck top to set the tub on temporarily. Mix some Portland cement powder, not concrete mix. You want a smooth cement mixture without aggregate. Normally a single bag, 40 lb, 50 lb should be enough. You want to mix it to a consistency of approximately peanut butter. The idea is to pile the mortar up several inches tall in a few uniformly placed piles directly under the bathing well of the tub. (Baths that have support feet built into the bottom from the factory don’t require the piles of mortar but it’s still a good idea to mortar or glue the feet down so there is no movement.) Once you have the mortar in place you carefully lower the tub down into the opening and into the mortar. Gently press the tub into your bed of mortar until the bottom lip of the tub just touches the shims. You do not want to force it into the shims. It must only lightly touch the shims. Assuming your tile deck it completely level make sure the lip of the tub is also completely level and just touching the shims all the way around. Do not disturb the tub and let the mortar harden overnight.
Once the mortar is hardened gently remove the wood shims. Wiggle them back and forth and gently ease them out. If you just pull them straight out you might chip the acrylic at the edge. After you have all the shims removed the tub should be completely supported from below and not hanging from the lip. You should have approximately a 1/8” gap between the top of your tile and the underside of the tub lip.
These tubs are all water tested before they leave the factory but a lot can happen between then and the time of final installation. For that reason, before you enclose the front of the deck you need to test the tub. If something got bumped, cracked, etc, now is the time to find it.
Make all your final drain connections and plug the pump or control box into your GFCI 120 volt receptacle. Fill the tub to check for leaks. If you don’t have the faucets completed at this time use a garden hose from another area where there is water available. Fill the tub to a level just over the highest jets. Turn on the pump and check everything over. Make sure it functions properly and check the lower areas for leaks or any sign of water.
Once you’re satisfied all is good with the tub, no leaks, no problems, you can enclose the front. Keep in mind that you need to provide an access panel that will allow you reasonable access to the side of the tub with the pump and controls. A reasonable sized access panel must be part of the plan during the initial construction. If you or someone working for you choose not to build an access panel in right away, and you have some minor issue down the road that needs to be dealt with, you are going to be the one that gets to figure out where to cut through walls to gain access. It’s much better to install one right away so it’s in the right place and hopefully you will never need it.
Finally run a small bead of clear or colored 100% silicone rubber into the 1/8” gap between the tile and the tub lip. Make sure you force the silicone into the gap so it goes under the lip of the tub. The silicone will effectively form a rubber gasket between the tub and the tile acting as a cushion and at the same time seal that gap so water will not leak into the underside of the tub.
You can speak to a whirlpool bath expert free weekdays 10-6 and weekends 10-3 central time. Call us at
1-800-809-9111
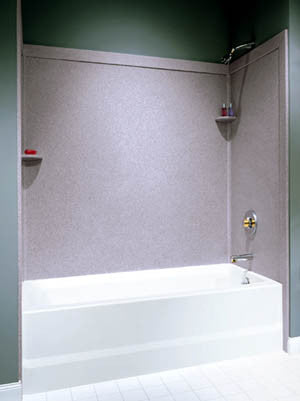
An alcove installation means that the tub is installed against (normally) 3 walls. Your walls should be framed so that the tub fits right up to the studs. You need to frame the alcove about 1⁄4” longer than the actual tub size at the most. If you have too much gap it will be more difficult to get everything water tight. Ideally the tub sides should just touch the wood.
After the walls are framed, set the tub into the space. Use a level check to see that the top of the tub lip is completely level in all directions. You will probably need to use shims under the tub or under the tub feet if applicable. If you plan to use mortar make sure the gap under the tub is adequate to allow for an inch or so of the mortar. If your model has feet built in you will want to glue them down or use a small amount of mortar under each foot. Get the tub at the exact height you want and completely level.
Once it’s completely level and at the proper height reach under the tub with a pencil or marker and using the bottom edge of the tub as your guide, draw a line across the studs to indicate the exact bottom of that tub lip. Once you have drawn that line on all three sides where the tub will come into contact with the studs, remove the tub.
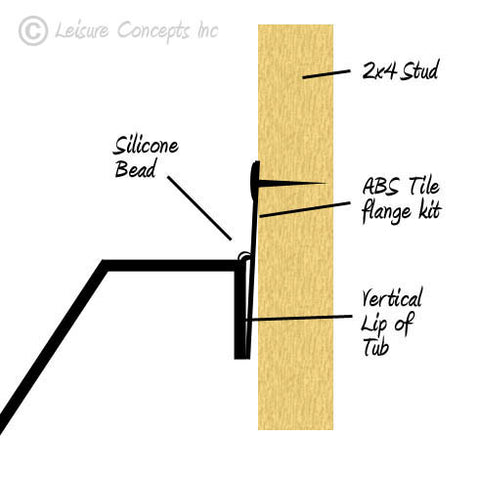
Fasten a 1” x 4” or a 2” x 4” to the studs so that the top of the board is right where your line is. That will be at the bottom of the tub lip. Screw or nail that board to the studs. This board will provide support to the top lip of the tub. If anyone ever steps on that tub lip, the board in direct contact with the bottom of the lip will prevent it from moving and possibly cracking.
Now that you have your support boards in place set the tub back in to make sure everything is perfect. The bottom of the tub lip should set right on top of the boards and be hanging (for now) from those boards. Check to make sure it’s completely level in all directions. Look into the open front of your alcove at the gap between the bottom of the tub and your floor below the tub. You want somewhere around a 1” gap. Hopefully you have your wall support boards at the right height but if not, if the gap is a few inches, remove the tub and use scrap plywood, 2 x 4, 2 x 6, whatever is needed to build up the floor to reduce the gap to about that 1”. Screw those shim pieces together so they don’t shift of move. If you have about a 1” gap you will only need 1 bag of Portland cement to set most tubs into. If your gap is too big you will need a bunch of heavy Portland cement to fill that gap and that isn’t good or necessary.
Remove the tub for the final time. Mix some Portland cement powder, not concrete mix. You want a smooth cement mixture without aggregate. Normally a single bag, 40 lb, 50 lb should be enough. You want to mix it to a consistency of approximately peanut butter. The idea is to pile the mortar up several inches tall in a few uniformly placed piles directly under the bathing well of the tub. (Baths that have support feet built into the bottom from the factory don’t require the piles of mortar but it’s still a good idea to mortar or glue the feet down so there is no movement.) Once you have the mortar in place you carefully set the tub back into the alcove and lower it down into the mortar piles. Gently press the tub into your bed of mortar until the bottom lip of the tub just touches the wall support boards. You do not want to force it into the support boards. It must only lightly touch them. Do not disturb the tub and let the mortar harden overnight. The tub is now in place, properly supported and the waste and overflow can be connected. It might be possible (depending on your access) to install the waste and overflow fittings into the tub before you lower it down into the mortar for the final time but making the pipe connections while the mortar is still soft might mess up your installation if you move the tub while you’re gluing your pipes together. As long as the front access is good it’s best to wait until the tub is set solid in the mortar to make those connections. Use your best judgment based on the installation specifics.
These tubs are all water tested before they leave the factory but a lot can happen between then and the time of final installation. For that reason, before you enclose the front of the alcove you need to test the tub. If something got bumped, cracked, etc, now is the time to find it.
Make all your final drain connections and plug the pump or control box into your GFCI 120 volt receptacle. Fill the tub to check for leaks. If you don’t have the faucets completed at this time use a garden hose from another area where there is water available. Fill the tub to a level just over the highest jets. Turn on the pump and check everything over. Make sure it functions properly and check the lower areas for leaks or any sign of water.
Once you’re satisfied all is good with the tub, no leaks, no problems, you can enclose the front. Keep in mind that you need to provide an access panel that will allow you reasonable access to the side of the tub with the pump and controls. A reasonable sized access panel must be part of the plan during the initial construction. If you or someone working for you choose not to build an access panel in right away, and you have some minor issue down the road that needs to be dealt with, you are going to be the one that gets to figure out where to cut through walls to gain access. It’s much better to install one right away so it’s in the right place and hopefully you will never need it.
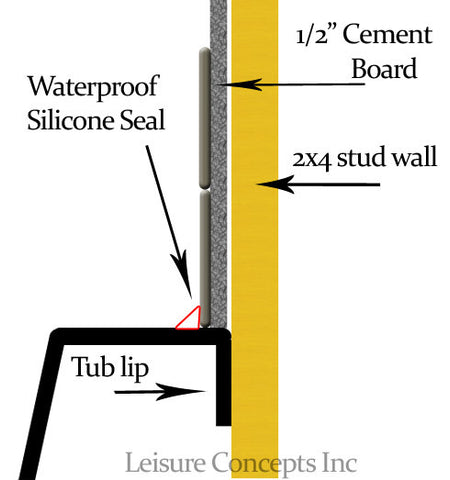
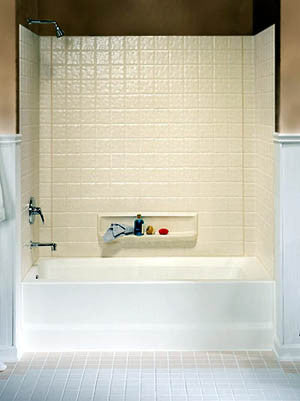
To install tile on the walls above the tub you can install 1⁄2” waterproof cement board directly onto the studs. If you want to or need to come out over the lip of the tub a little more you can use 2 layers of 1⁄2” cement board. That will span any gap between the tub edge and the studs. When you bring your cement board down to the top lip of the tub stop about 1⁄4” above the tub. Do not bring the cement board all the way down to the tub. Leaving a small gap will prevent wicking. Once the cement board is in place you can install your tile. Use an acrylic additive in the grout and once cured seal the grout joints with a waterproof silicone grout sealer. When the tile is complete, grouted, done, you will want to fill the gap between the bottom of the tile and cement board and the top lip of the tub with 100% silicone caulk. The gap should be 1⁄4” high and extend back toward the studs about 3⁄4” or so under the tile and the cement board. You want to fill the entire area with silicone. The best method is to fill the tub with water so the weight of the water will push down on the tub. With the tub still full, install the silicone. Leave the water in the tub overnight until the silicone cures. That way if there is any slight movement downward when the tub is full, the caulk will be at it’s normal installed state. When the tub is empty, it will be slightly compressed. This will prevent the silicone from pulling away from either surface. If this installation is done correctly it should last for over a decade without any leaks.
You can speak to a whirlpool bath expert free weekdays 10-6 and weekends 10-3 central time. Call us at 1-800-809-9111.
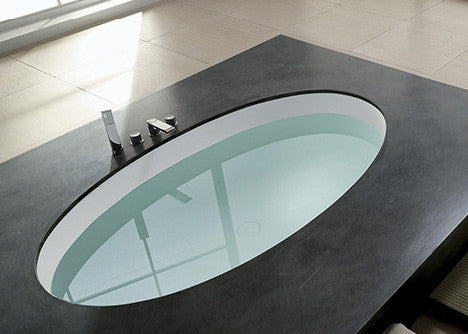
It is possible to undermount many of our models. To undermount a tub means to have the tub opening placed below a covering, usually made of marble or stone. This requires a tub with a completely flat edge. There are many models that we sell that can be undermounted, but it requires special planning before the purchase, as we need to relocate many of the tub's controls. If you are interested in undermounting a whirlpool from Leisure Concepts, or you would like to know which models can be undermounted, please contact our sales specialists at
1-800-809-9111, or email us at
sales@leisureconcepts.net
The above information is meant to be general guidelines only. Each installation is unique and many installation methods may also work just fine. Seasoned professionals may have slightly different methods but as long as common sense is used to achieve the above goals the installation should work out good.